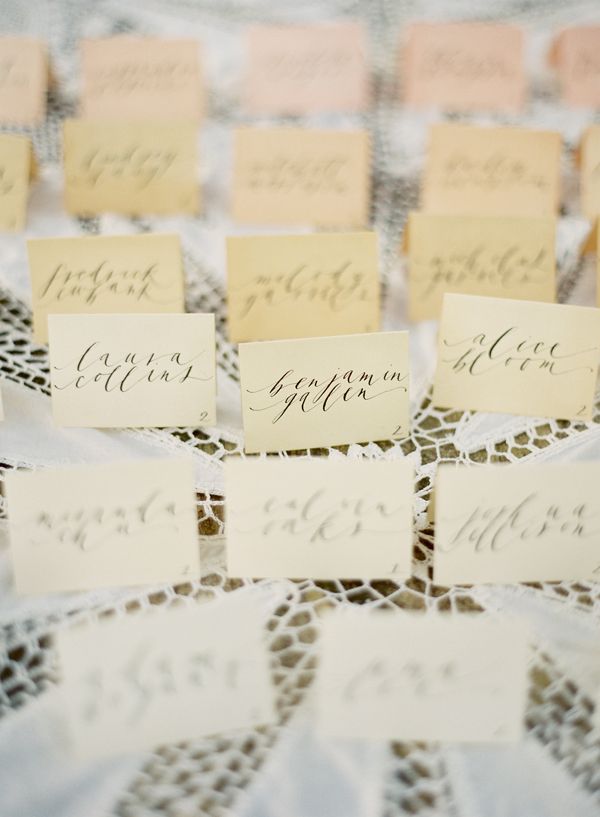
We asked Mara of Neither Snow to share how she created the beautiful escort cards above.
She says it only takes about an hour – not bad! I think you’ll find her tutorial super thorough.
Supplies: 1. measuring cup, 2. black tea bags, 3. dye (see below), 4. place cards, or the paper or fabric of your choice.
I used cards from the Paper Source in luxe cream and luxe white, which have a visible nubby texture. You will also need 5. containers for the dye, as many shades as you want and sized to your item (I used six), 6. an iron, 7. a plastic spoon, chopstick or other stirring device, 8. a piece of butcher paper or old sheet, 9. rubber gloves.
**About the dye: I used ProMX vanilla bean and peach dye from ProChemical. They have an abundance of information about how to properly dye fabric here. I found ProMX > Immersion most useful. This tutorial assumes that you are dying paper for a craft project (not high art/archival work, etc.). The final results are not colorfast. Also, as a disclaimer: I totally made this method up as I went. I’m sure with enough Googling you’ll find variations that are both simpler and more complex. I recommend doing this project outside if you can, as the dye does stain surfaces.
Restaurants often carry these heavy-duty take-out containers that are perfect for smaller projects like placards.
To achieve this spectrum of shades, disperse different combinations of the tea and dye.
Here are my (totally imprecise, off the cuff) recipes: 1. one tea bag, 2. one tea bag + 1/8 teaspoon peach dye, 3. two tea bags, 4. 1/4 teaspoon vanilla bean + 1/8 teaspoon peach, 5. 1/4 teaspoon peach + 1/8 teaspoon vanilla bean, 7. 1/2 teaspoon vanilla bean
I dyed 10 cards in each bath, 5 of each color. I also reserved 5 of each color (cream and white) which I integrated at the end of the beige spectrum. The vibrantly colored dye (peach, in this case) goes a long way, so be sparing if you are after a subtle look.
In each container, pour 2 cups of boiling water.
Use a chopstick or plastic spoon to stir the clumps of dye until dissolved.
Let the teabags steep for about 5 – 8 minutes, or more or less depending on the depth of color you want.
Remove the teabags and immerse the cards into the color baths.
Be sure to individually immerse each one, so the front and back is washed with color before placing the next one on top.
This cramped arrangement will result in color variation. If you want a consistent color surface, immerse the cards in a bigger bath so they can float about completely. I immersed all of the cards for an equal amount of time in each bath, about 10 minutes, more or less. Check in every few minutes and remove the shades that are getting too dark. While your’e waiting, set aside your sheet or big piece of butcher paper.
Remove the paper and drip off excess liquid (don’t use your fingers for the dye — have gloves on hand or use the plastic spoon or chopstick). Set the cards out to dry in the sun or inside for at least 24 hours. Once dry, you can use an iron on a medium setting to iron the cards flat and crease into a tent.
Arrange the browns from darkest (recipe 3: 2 teabags) to lightest (the undyed white). Next, arrange the pinks from darkest (recipe 2: peach + teabag) to lightest (recipe 5: peach + vanilla bean). Obviously there will be variation so just go with what you think looks best. Once you have the spectrum the way you want it, send the cards to your calligrapher, write the names yourself or run them through a printer. In all cases, be sure to make 20 – 30% more in each color as mistake cards cards for the calligrapher, to test out yourself, or to feed to the printer gods.