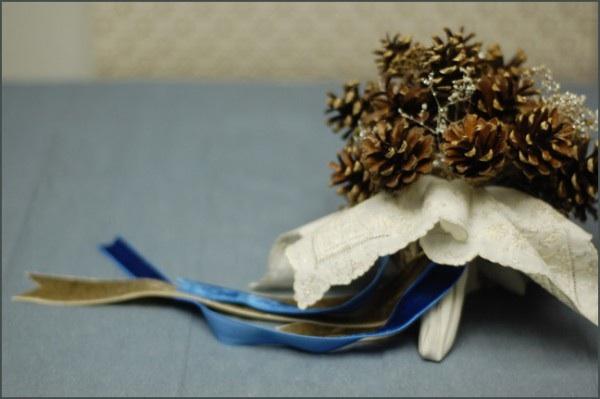

Laurie’s project this week is not only a great alternative to a fresh flower bouquet, but the construction of the piece isn’t too diffucult for a novice to tackle either. Can’t you just see a little flower girl wearing her winter cardigan carrying a nosegay of pincecones down the aisle? If you are new to Once Wed and would like to see previous DIY projects, click here. Enjoy!

What You’ll Need:
15 – 20 small pine cones
15 – 20 strands of floral wire
Brown floral corsage tape
A lovely hankie
Dried and preserved glittered babies breath or similar dried filler flower
1 yard of ribbon l ( I used two different colors and widths)
1 short zip-tie (rubber bands will work too)
Wire cutters
Scissors
Resources:
Most of the supplies are available at any craft store.
Take a walk and collect your pine cones.
Velvet ribbon is made by Midori.

Directions:
1. Take one of your wires and run the middle of the strand between
the lowest layers of “scales” on the pine cone. Fold both ends of
the wire down, and twist the wire tight until the pine cone is secure.
(see figure 1)
2. Wrap the floral tape around the two wire ends, starting at the
base of the pine cone and working your way down. Pull the tape as you
wrap. It becomes sticky as you stretch it. (see figure 2)
3. Wire and tape all of the remaining cones. For a small bouquet,
it will take 15 to 20 pine cones.
4. Once you have all the cones wired, bundle the pine cone “stems”
together to form a round bouquet. (see figure 3)
5. Wrap the bundled stems together with floral tape. Use your
wire cutter to trim the stems so the bouquet handle is about 5 inches
long. (see figure 4)
6. Break your filler flower into small sprigs. (see figure 5)
7. Tuck the springs in between the pine cones. (see figure 6) When
you’ve added all of your filler flower, wrap the bouquet handle with
another layer of floral tape to secure the filler.
8. Neatly press your hankie.
9. Turn your bouquet upside down and put the center of the hankie on
the end of the bouquet handle. Pull the hankie up towards the pine
cones to make a “cuff” around the base of the pine cones. Take your
zip tie or rubber band and secure the hankie around the “neck” of the
bouquet. (see figure 7)
10. Tie your ribbons around the neck of the bouquet to conceal the
zip-tie or rubber band. Trim the ribbon ends to desired length. (see
figure 8)
What it Cost:
Pine cones – Free from the neighbor’s yard!
Hankie – A wedding shower gift
Wire – Pennies a strand
Midori ribbon – $3.80 a yard
Glittered babies breath – $7 for a bundle (with plenty of extra left over)
Floral tape $2 – a roll
Project created by Laurie Cinotto