
Laurie really went all out for her DIY project this week by showing us 4 delicous ways to make regular candies stand out from the crowd. I think the bloom version is my favorite! Isn’t it amazing what a little color and detail will do to a regular piece of candy?

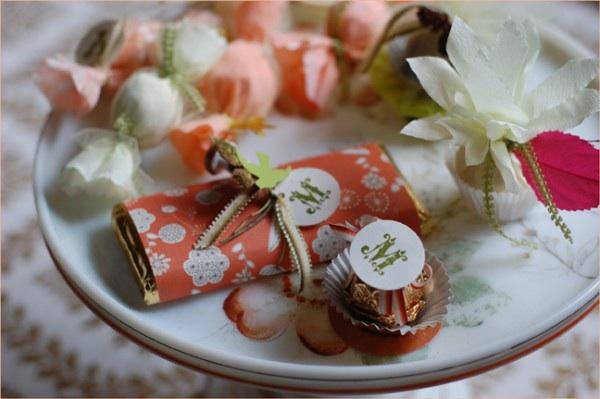
Start with a chocolate bar, and remove the paper label, leaving the inner foil layer in place. Cut a piece of decorative paper to size and wrap around the bar so the seam is on the underside. Use a piece of double face tape to secure. Tie a ribbon around the middle and attach some trim. I used a paper circle with a rubber stamped monogram, a spun cotton mushroom, a gold seal and a millinery leaf to trim this bar. You could also label the chocolate bars with the guests’ name, and use them as place cards.

Cut a rectangular piece of crepe paper, tissue paper, or decorative waxed paper. It should be long enough to wrap around the chocolate 2 or 3 times and the width should be about 4 times the chocolate’s diameter. Wrap your chocolate in your paper. Tie off the ends with a coordinating ribbon. To make them even fancier, add a layer of tulle over your paper. If you’re using crepe paper or tissue paper, be sure to wrap your chocolate first with a foil candy wrapper so the oil from the chocolate doesn’t bleed through.

Cut out a card stock circle approximately 1 1/2 inches in diameter (or use a craft punch). Glue a candy cup (or a mini cupcake liner) in the center of the circle. Place a foil wrapped chocolate in the center. Make a small bow and glue it (using a tiny dot of glue with a LOW temp glue gun) on the top of your foil-wrapped chocolate. Create a monogram using a rubber stamp on a card stock circle and glue in the center of the bow.

How to Make Your Chocolates “Bloom”
What You’ll Need:
Crepe paper ( or tissue paper)
Ribbon (1/8 of an inch wide)
Wired millinery leaves
Foil wrapped chocolates
Scissors
Low temp glue gun

Instructions1. Begin by cutting a 6″ (approximately) square of crepe paper.

2. Fold in half, then into quarters. (See figure 1)
3. Fold in half again to make a triangle (see figure 2) and then fold in half again. (It’s just like your folding a snowflake).
4. Cut a rounded “V” in the non pointy end of the triangle. (see figure 3)
5. Unfold your crepe paper. It should be shaped like a daisy. ( see figure 4)
6. Put a foil-wrapped chocolate in the center of the daisy. (see figure 5).
7. Pull the petals up around the chocolate, and tie a ribbon just above the top of the chocolate.
8. Drop into the candy cup, and fluff your paper flower petals. Add a wired leaf around the neck to complete.
9. Arrange on a dish or place a bloom at each place setting.
Resources:
Candy foils and cups are available at any large craft store or online at Kitchen Krafts
Martha Stewart has beautiful waxed papers for wrapping candies at Michael’s
Project created by Laurie Cinotto