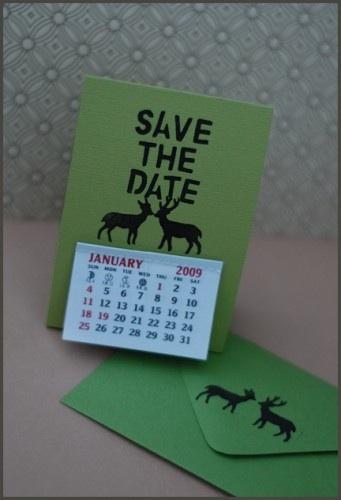

Creating your own paper goods for your wedding can be great way to cut costs, but where do you start if you want to go more of the handmade route and don’t own a letterpress printing machine or a gocco? Well, leave it to Laurie Cinotto to show us how to create an adorable set of “Save the Dates” without breaking the bank. I love the concept of “printing by hand” and like so many of Laurie’s other projects the possibilites are endless. Invitations, napkins, coasters, table runners – you name it and it can be done. Enjoy!

Acrylic blocks are available in any craft store carrying stamping products.
Sticky foam sheets are found in the kids craft section in craft stores.
Directions:
1. Begin by measuring and cutting a strip of card stock 3 inches wide and 12 inches long.
2. Fold in half and crease the paper, open up and lay creased side down. (see figure 1)
3. Measure in two inches from each end, and fold both ends towards center crease. (see figure 2)
4, On one end, use your scissors or X-Acto knife to a one inch square from each corner. This will leave a tab, one inch wide, on the end of your paper.
5. On the other end, cut a slit 1 1/4 inch wide in the center of the two inch end section.(see figure 4)
6. Set aside while you prepare your stamp.
7. Decide what you would like your stamp to say. Use your alphabet punches to punch out all of your letters for your stamp from your adhesive backed foam. You’ll want the sticky, paper coated side to be on the face (front side) of the letters. (see figure 5)
8. Use your craft punches to punch out any images you would like to add to your stamp. I chose two deer craft punches for my stamp, but you can use any image or motif to coordinate with your wedding theme. You can also draw any image onto your foam and cut it out with an X-Acto knife or small pair of scissors to create something unique.
9. Starting from the middle, working your way out, remove the paper back, and stick your letters and images on your acrylic block. Be sure that your letters and images are in reverse and use the guides printed on the block to keep things straight. If your block isn’t ruled, lay your block over a sheet of graph paper while you work. (see figure 6)
10. When all letters and images are in place, ink up your stamp using a pigment ink pad. I prefer to use a smaller one rather than a large pad. I find it’s a little easier to control the application of ink with the smaller. (see figure 7)

11. Give your stamp a trial run on a scrap piece of paper. Place the paper on a smooth, even surface. Place the inked side of your stamp on the paper and press firmly. Carefully remove. If you’re pleased, ink up again, lay your creased and folded card stock flat, and stamp just below the middle crease. (see figure 8 and 9)
12. Set aside the stamped card stock and allow to dry.
13. Take your paper calendar and open it up to your wedding date. Take a pencil eraser, dab it on an ink pad, and stamp a dot on the calender to mark your date. (see figure 10)
14. Glue your calendar on your card stock, just below your stamped text and image. (see figure 11)
15. Insert the tab into the slit to complete your desk calender. (see figure 12) Fold it flat to fit in an envelope along with any other information or details you would like to send to your guests.
You can create these custom stamps to decorate invitations, envelopes, place cards or any other paper products. You can use fabric inks instead of pigment inks to stamp on fabric napkins, table cloths or table runners. The possibilities are endless.
Even though you are working with inks for rubber stamps, when they are printed using the foam stamps, they have a quality similar to a silk screened image. When you are through with your project, you can remove your letters and images, clean with alcohol, and use again.
Project created by Laurie Cinotto