


What You’ll Need:
A small favor or jewelry box with a lid (the one I used was 2.5 x 3.5 inches)
A twig
Tiny flowers (velvet, silk, or paper)
A bit of reindeer moss
Decorative paper
A scrap of ribbon ( about 6 inches long)
Several of your wedding photos (they should be small enough to nest in the lid of your box)
Paper glue
Hot glue gun and glue sticks
Scissors
Ruler
A pair of tweezers
Resources:
Favor boxes and velvet flowers available atPackaging Specialties. Wedding photos (of my friends Eileen & Matthew) by One Love Photo. . Wood grain paper was printed by hand using All Night Media’s wood grain rubber stamp (available on line at Plaid )

Directions:
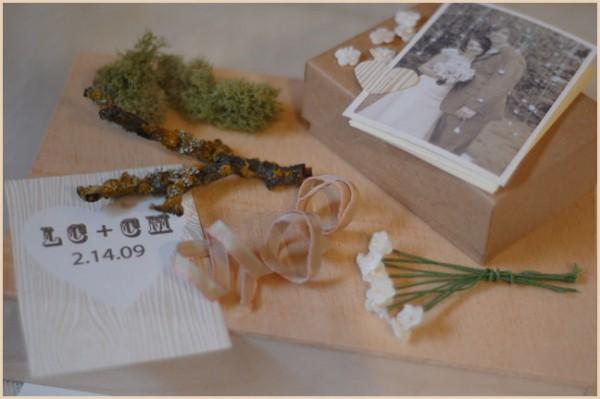
1. Open your box, and glue down the center of your ribbon scrap horizontally inside the box lid. (see figure 1)
2.. Measure the interiors of both the box lid and box bottom. Cut a piece of paper slightly smaller than these dimensions (one for the top and one for the bottom). Glue down these papers using your paper glue. Be sure that the tails of the ribbon in the box lid remain free. . (see figure 2)
3. On a piece of paper, create a design for the top of your box. You can do this free hand, with rubber stamps, or use your computer and print out images or text. Cut out your design (it should be the same dimensions as your box lid) and use your paper glue to adhere it to the box top. (see figure 3)
3. Prune a small twig to resemble a tree. It should be slightly shorter than the height of of the box. Use hot glue to attach the base of the tree to the bottom side of the box. (see figure 4)
4. Trim the heads off of your tiny flower stems and glue them (using your glue gun) on your tree branches. (I found it easier to hold them with tweezers during this process). (see figure 5)
5. Glue moss around the tree base. Add any additional elements to your tiny scene to make it your own. (see figure 5)
6. Place a small stack of your wedding photos in the box lid. Use the ribbon to secure the pictures in the box lid by tying the tails into a bow. (see figure 6).
What it cost:
Favor boxes – $.75 each (but you get a substantial discount for purchasing in bulk)
Tiny velvet flowers – $2 for a small bag with four tiny bouquets
Reindeer Moss – $3 for a small bag
Ribbon – $. 79 a yard
Wood grain rubber stamp – $14.99
Project created by Laurie Cinotto